H5P - interaktive Lernelemente erstellen
H5P - create interactive learning elements
Ziele:
Ein H5P-Lernelement über den Inhaltsspeicher des Kurses erstellen und korrekt konfigurieren.
Was ist H5P? H5P ist eine freie und quelloffene Software für die Erstellung von interaktiven Lerninhalten im HTML5 Format. Weitere Details finden Sie auf: https://h5p.org/.
Schwierigkeit: fortgeschritten
Gültig ab Moodle Version 4.2
Goals:
Create and correctly configure an H5P learning element using the course content bank.
What is H5P? H5P is a free and open source software for creating interactive learning content in HTML5 format. More details can be found at: https://h5p.org/.
Difficulty: advanced
Valid from Moodle version 4.2
10 Schritte:
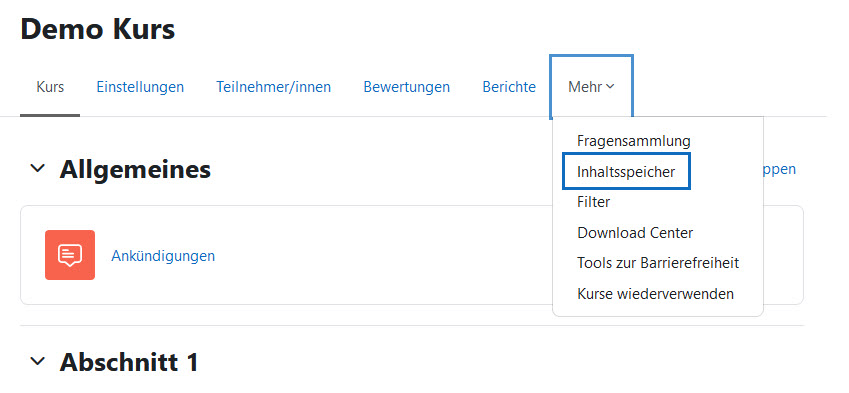
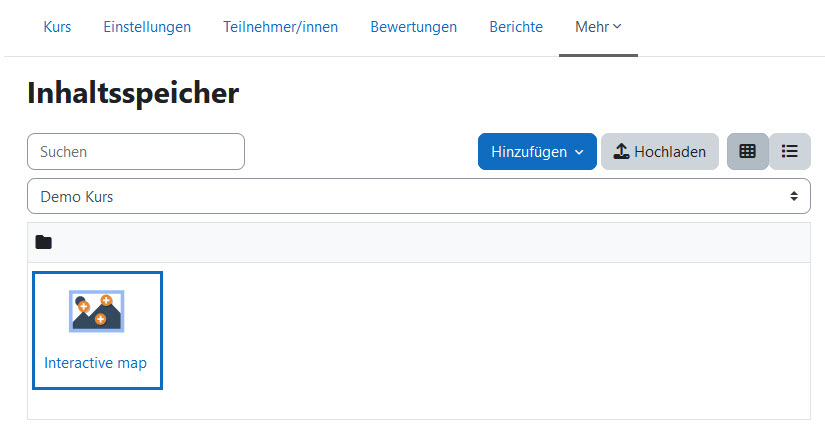
Inhaltsspeicher öffnen
Öffnen Sie in der Navigation unter der Option „Mehr" den so genannten „Inhaltsspeicher".
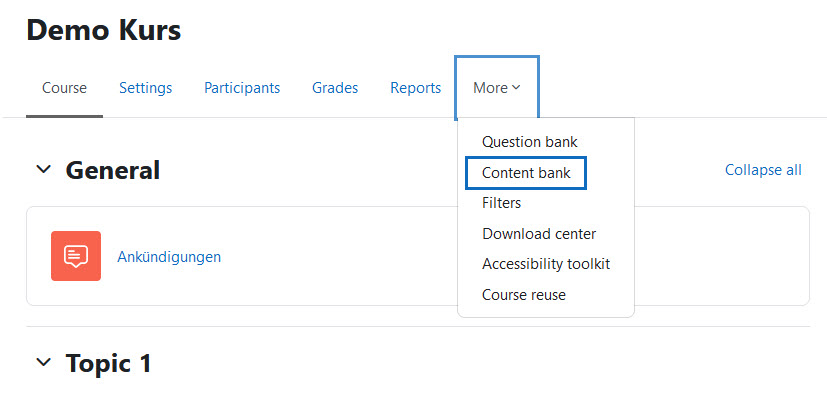
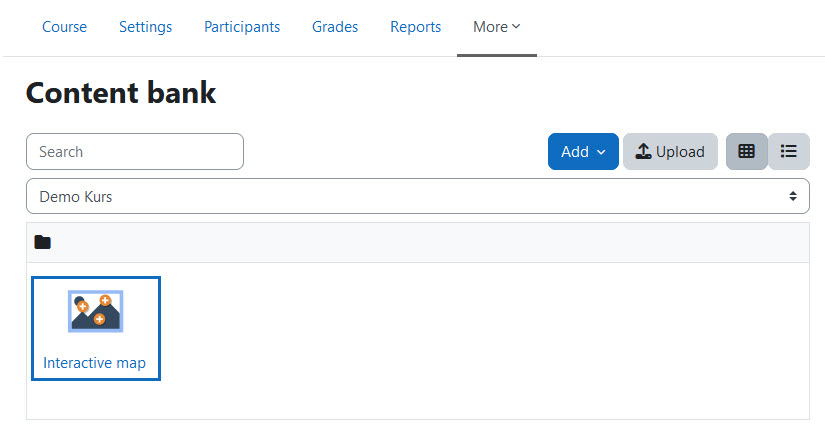
Open content bank
Open the so-called "Content bank" in the navigation under the "More" option.
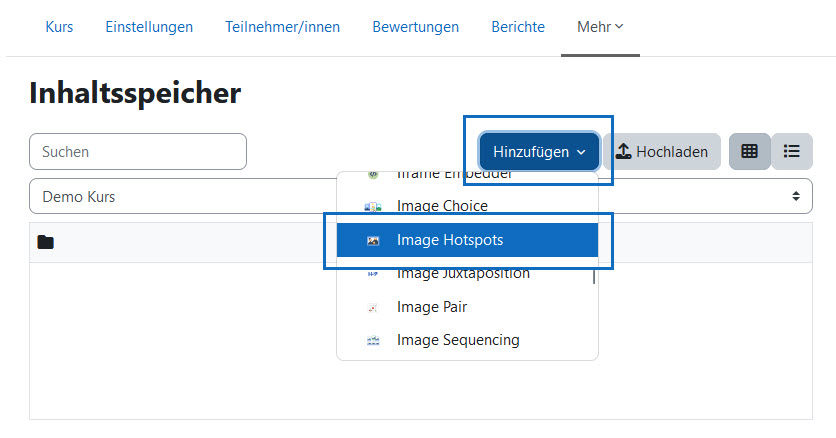
Gewünschtes H5P-Element erstellen
Im „Inhaltsspeicher” finden Sie alle dem Kurs hinzugefügten H5P-Elemente. Zu Beginn ist der Speicher leer. Klicken Sie auf „Hinzufügen”, um die Liste der verfügbaren H5P-Elemente zu sehen. Je nach Hochschule können unterschiedliche Typen verfügbar sein! Klicken Sie in der Auswahl auf einen H5P-Typ Ihrer Wahl, in diesem Fall auf „Image Hotspots”.
Tipp: Unter dem nachfolgenden Link finden Sie Beispiele für alle H5P Typen, die den typischen Lehreinsatz verdeutlichen: https://h5p.org/content-types-and-applications
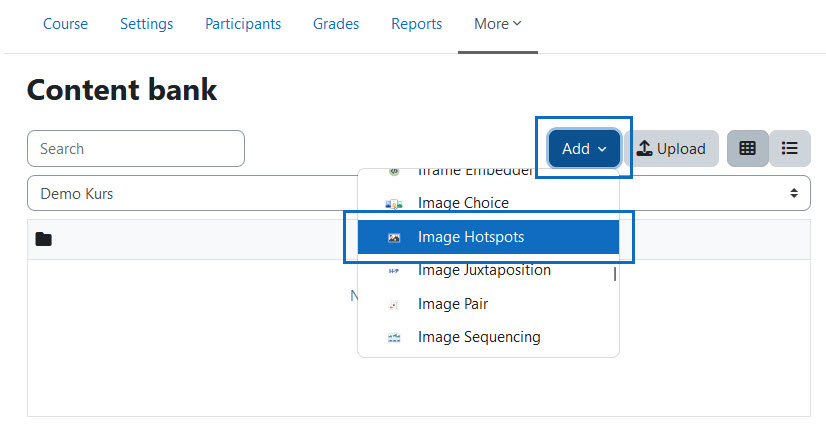
Create desired H5P element
In the "content bank" you will find all H5P elements added to the course. Initially, this bank is empty. Click on "Add" to see the list of available H5P elements. Different types may be available depending on your university! Click on an H5P type of your choice in the selection, in this case "Image Hotspots".
Tip: Under the following link you will find examples of all H5P types that illustrate the typical teaching application: https://h5p.org/content-types-and-applications
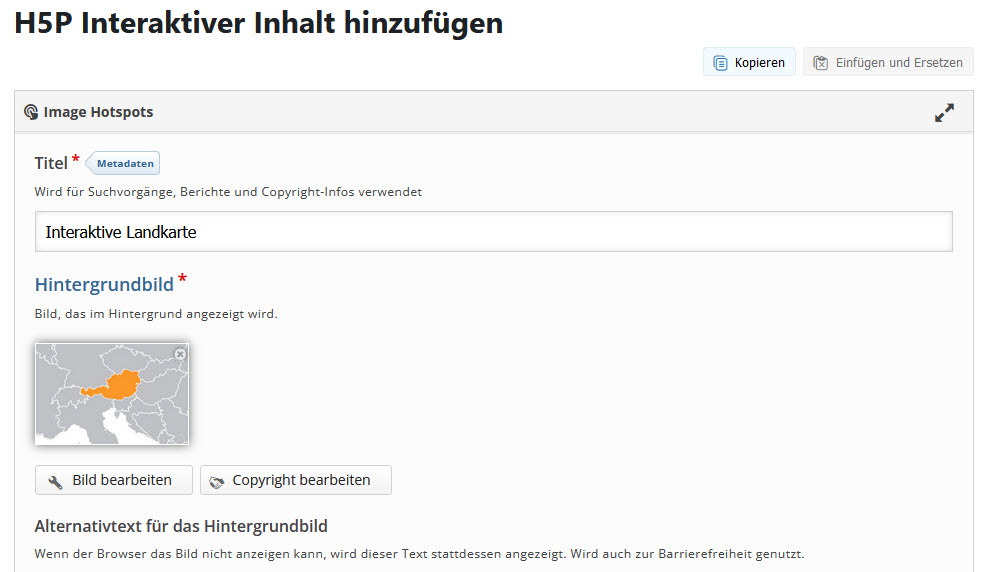
H5P im Editor erstellen
Im sich öffnenden Editor können Sie nun das H5P-Element erstellen.
Hinweis: Der Erstellungsprozess von H5P-Elementen kann sehr verschieden sein und unterschiedlich viele Schritte umfassen. Um in dieser Anleitung Platz zu sparen, verweisen wir Sie auf (Teile) dieses Video.
Wichtig: Wenn Sie mit dem Erstellen fertig sind, klicken Sie am Ende der Seite „Speichern”.
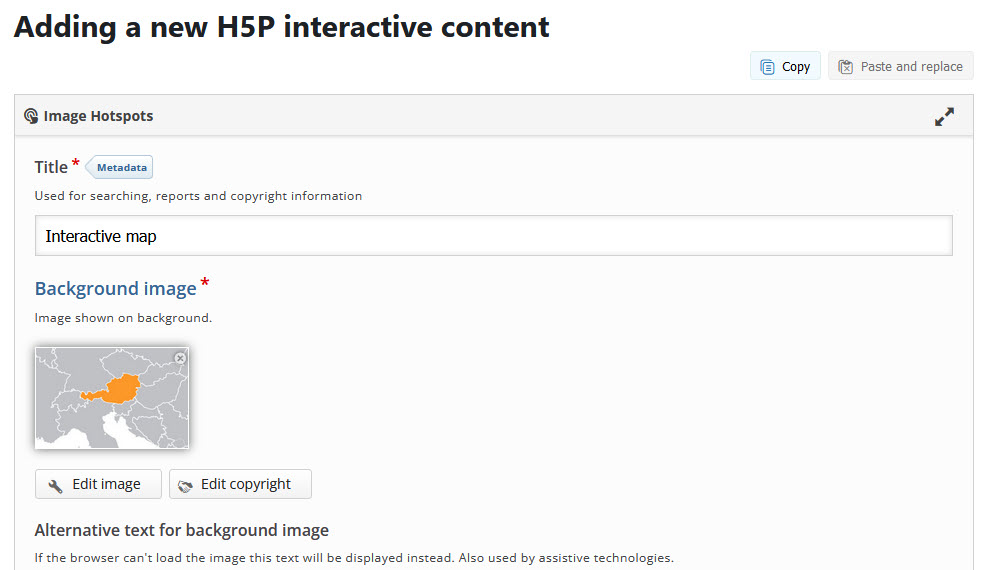
Create H5P in the editor
In the editor that opens, you can now create the H5P element.
Note: The process of creating H5P elements can be very different and may involve different number of steps. To save space in this guide, we refer you to parts of this video.
Important: When you are done creating, click "Save" at the bottom of the page.
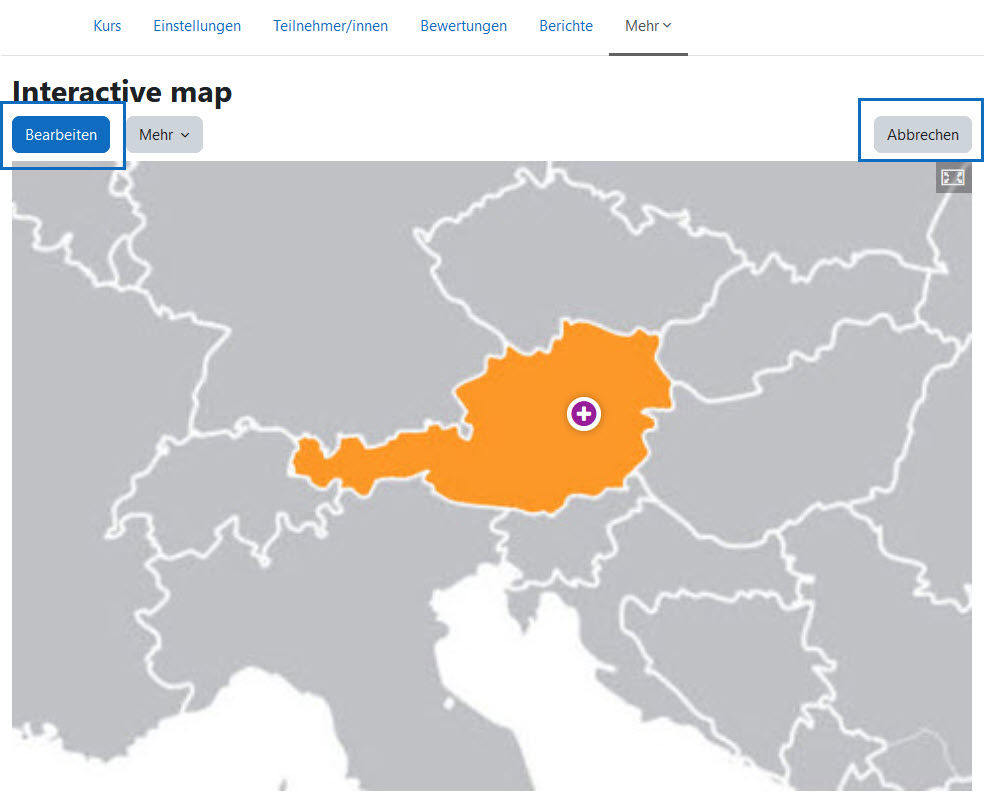
Vorschau prüfen
Prüfen Sie nun die Vorschau und klicken auf „Bearbeiten”, um etwaige Änderungen vorzunehmen. Klicken Sie auf „Abbrechen”, wenn Sie fertig sind und zum Inhaltsspeicher zurückkehren möchten.
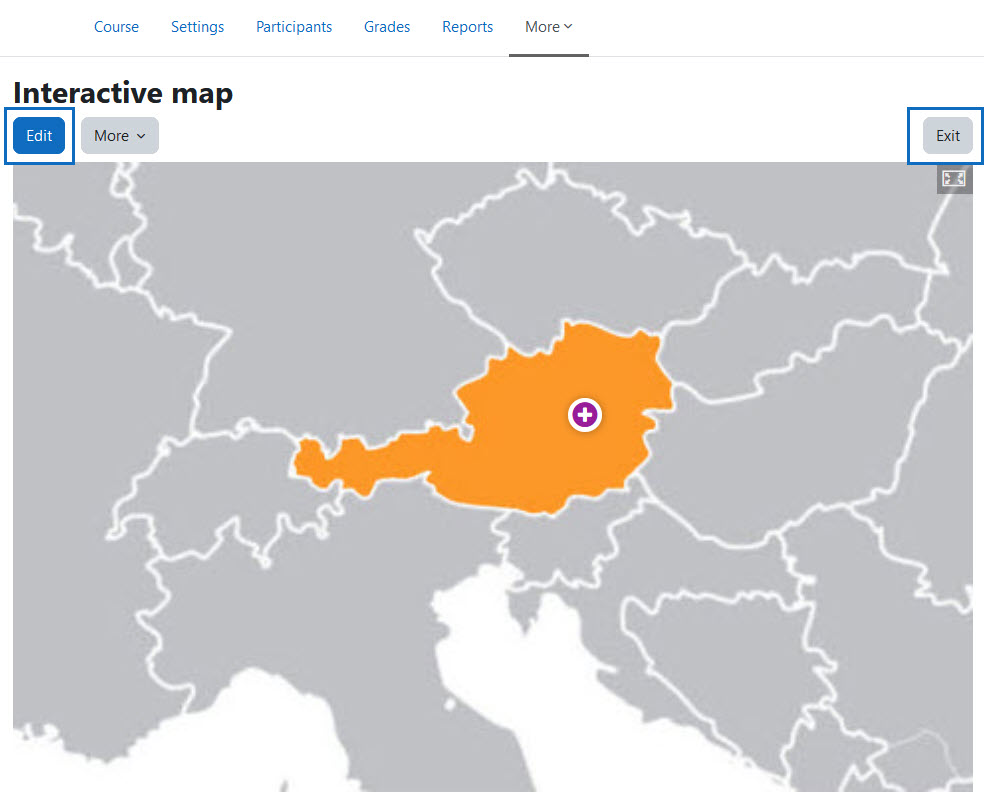
Check preview
Now check the preview and click "Edit" to make any changes. Click "Cancel" when you are done and want to return to the content bank.
Fertiges H5P Element im Inhaltsspeicher
Das H5P-Element ist nun fertig erstellt und wurde dem Inhaltsspeicher des Kurses hinzugefügt.
Finished H5P element in the content bank
The H5P element has now been created and added to the content bank of the course.
Aktivität anlegen
Sie sind nun bereit, das soeben erstellte H5P-Element als Aktivität dem Kurs hinzuzufügen. Legen Sie eine Aktivität „H5P" an, wie in dieser Anleitung beschrieben.
Create activity
You are now ready to add the H5P element you just created as an activity to the course. Create an "H5P" activity as described in this guide.
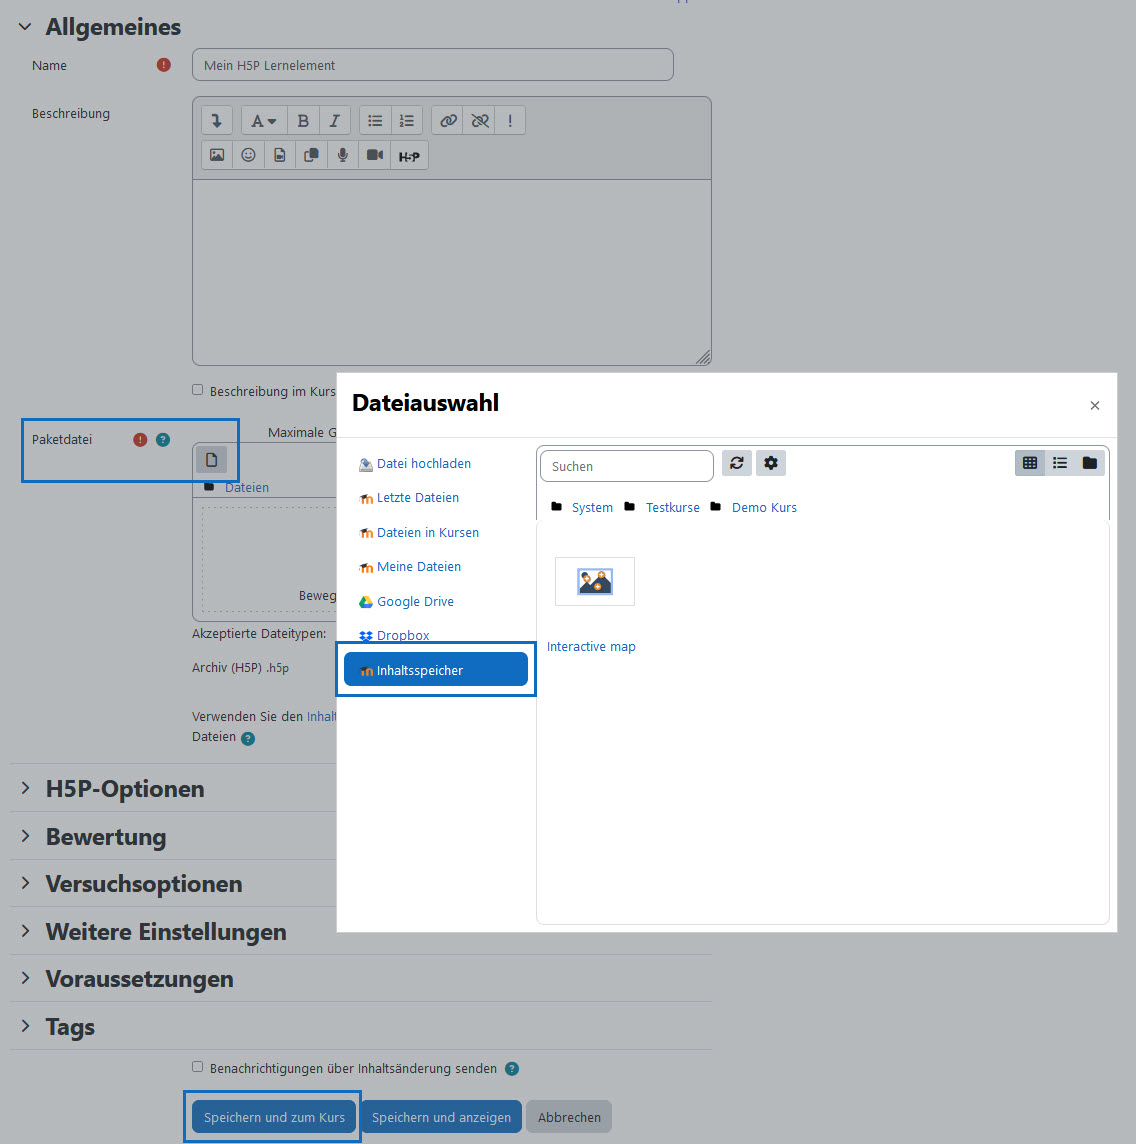
Einstellungen der H5P Aktivität
Auf der Seite der Einstellungen, tragen Sie zunächst den Namen des H5P Lernelements ein. Fügen Sie beim Parameter „Paketdatei" mit Hilfe des Dateiauswahl-Fensters (aus dem Inhaltsspeicher!) die zuvor erstellte H5P-Datei ein.
Hinweis 1: Im Abschnitt „H5P-Optionen" können Sie einstellen, ob Sie das Herunterladen erlauben möchten, ob Sie ein Einbetten gestatten und ob Sie die Copyright-Taste anzeigen möchten.
Hinweis 2: In den Abschnitten „Bewertung" sowie „Versuchsoptionen" können Bewertungen und die Versuche konfiguriert werden. Beachten Sie, dass manche, aber nicht alle, H5P-Elemente eine Versuchsverfolgung (für erweiterte Berichte wie Anzahl der Versuche, Antworten und Noten) bzw. die Verwendung von Bewertungen anbieten. Diese Themenabschnitte werden immer angeführt, unabhängig von der Verfügbarkeit der Funktionen. Beachten Sie, dass etwaige Einstellungen keine Auswirkung haben können. Informieren Sie sich bei Ihrem e-Learning Team, welche H5P-Elemente diese Funktionen unterstützen.
Wichtig: Vergessen Sie nicht, am Seitenende auf „Speichern und zum Kurs" zu klicken.
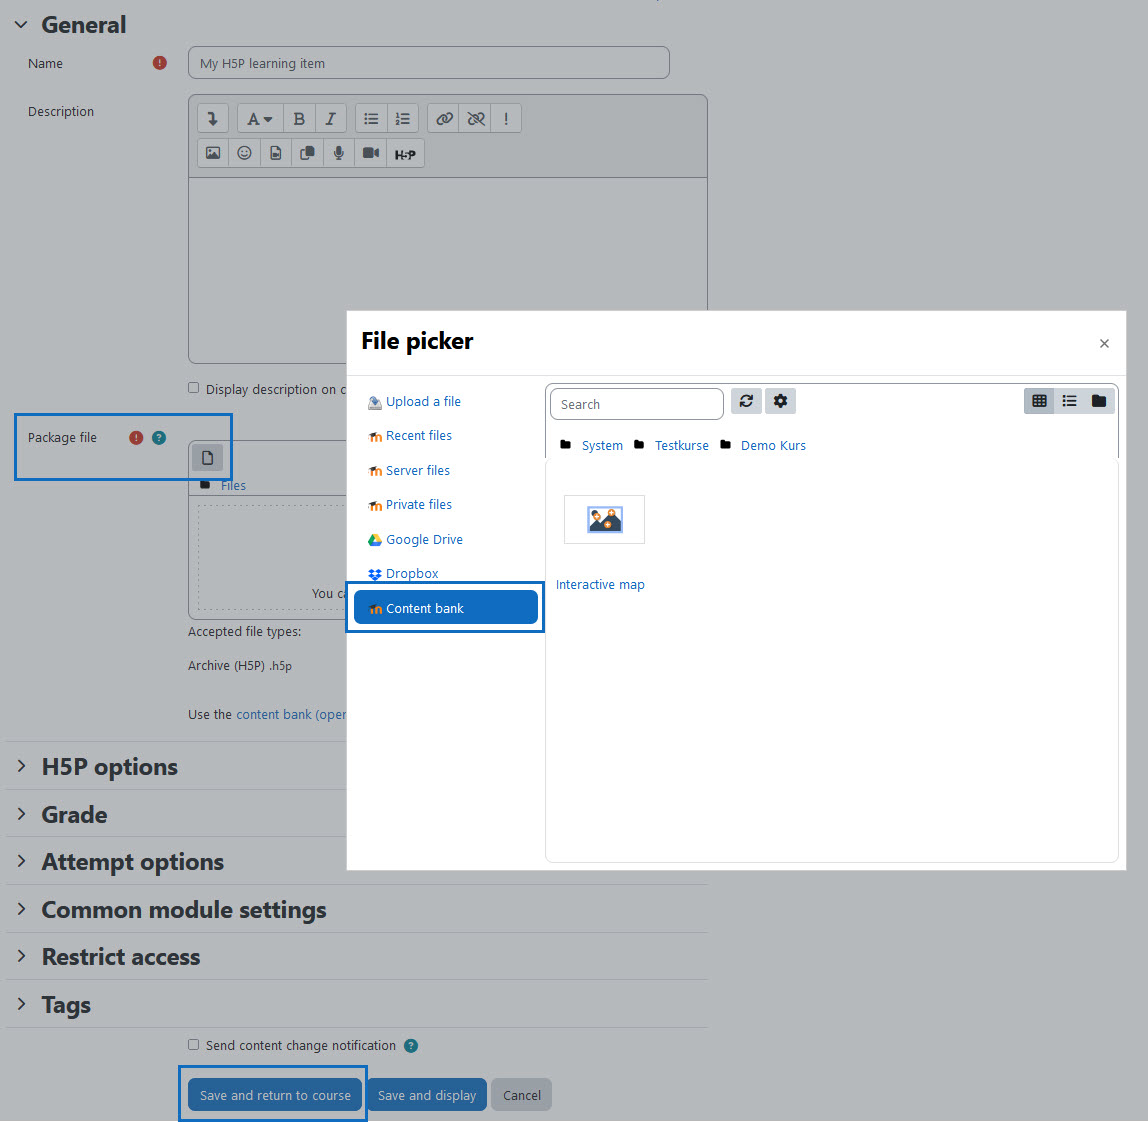
Settings of the H5P activity
On the settings page, first enter the name of the H5P learning element. At the parameter "Package file", insert the previously created H5P file using the filepicker window (use here the content bank!).
Note 1: In the "H5P Options" section you can set whether to allow downloading, whether to allow embedding and whether to show the copyright button.
Note 2: In the "Grade" as well as "Attempt options" sections, grades and the attempts can be configured. Note that some, but not all, H5P elements offer attempt tracking (for advanced reports such as number of attempts, responses, and grades) or the use of grades. These sections are always shown, regardless of feature availability. Note that your settings might have no effect. Check with your e-learning team to see which H5P elements support these features.
Important: Don't forget to click "Save and return to course" at the bottom of the page.
H5P erfolgreich zum Kurs hinzugefügt
Die H5P Aktivität wurde erfolgreich zum Kurs hinzugefügt. Lernende können nun auf das interaktive Lernelement zugreifen.
H5P successfully added to course
The H5P activity has been successfully added to the course. Learners can now access the interactive learning element.
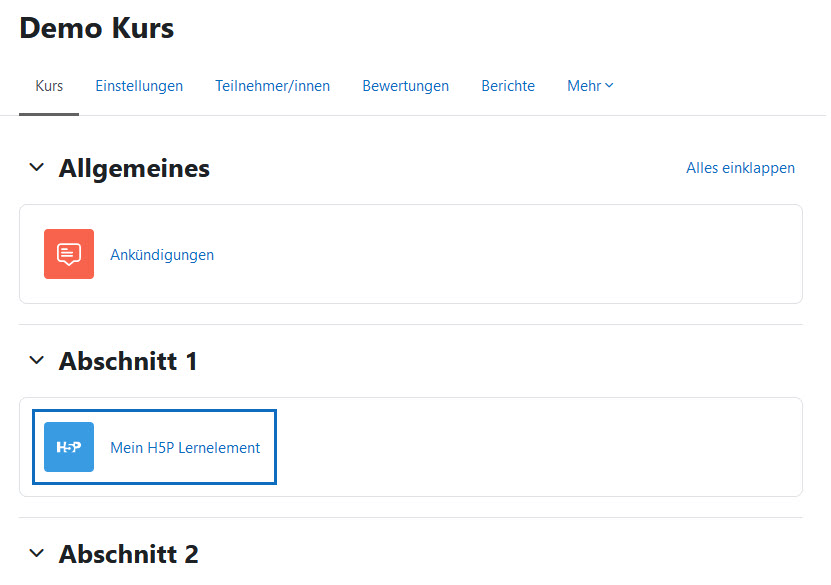
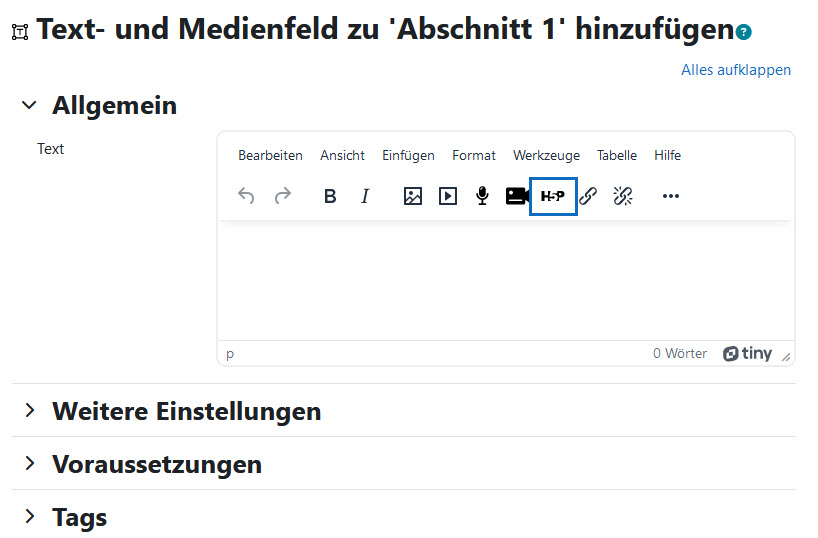
Ein Tipp zum Schluss
Tipp: In Kombination mit dem Arbeitsmaterial „Text- und Medienfeld“ können H5P-Elemente auch direkt auf der Kursseite platziert werden. Hierfür erstellen Sie das H5P-Element im Inhaltsspeicher (wie in dieser Anleitung gezeigt) und fügen Sie es in der Aktivität „Text- und Medienfeld“ mit dem H5P-Symbol des Editors hinzu.
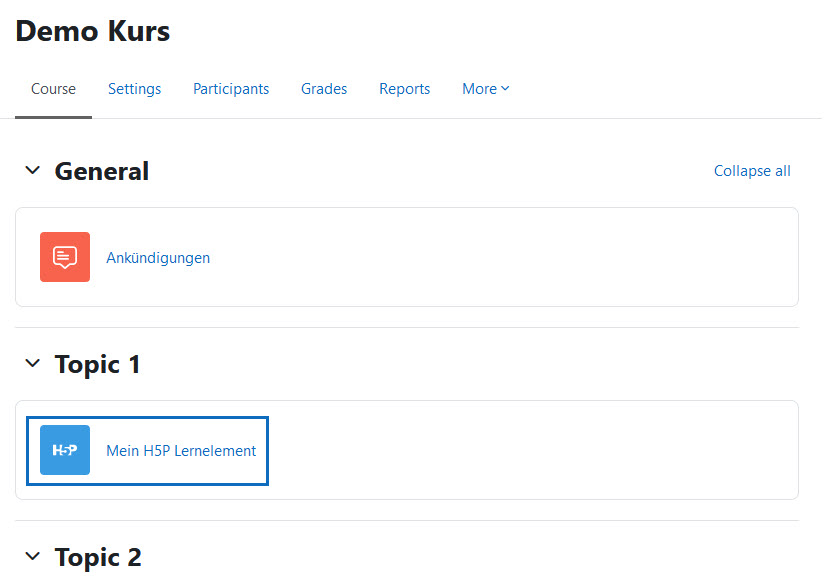
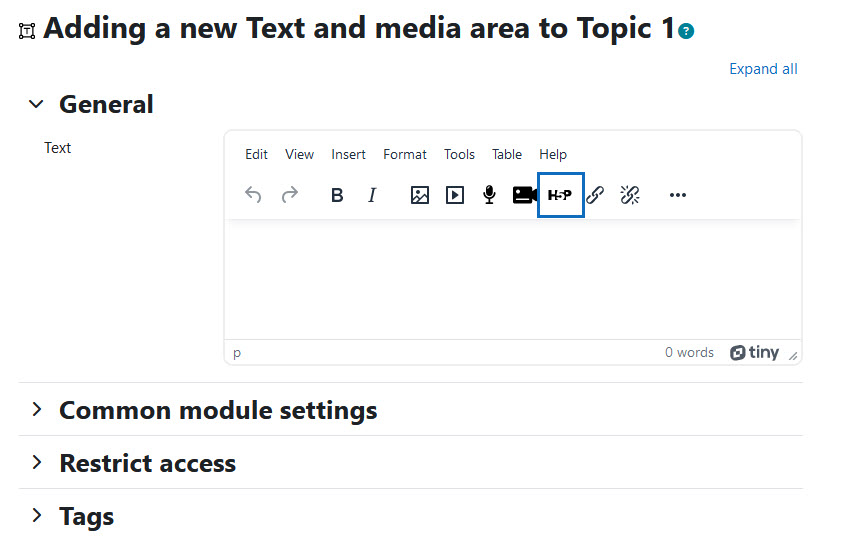
A tip at the end
Tip: In combination with the "Text and media area" resource, H5P elements can also be placed directly on the course page. To do this, create the H5P element in the content bank (as shown in this guide) and add it in the activity "Text and media area" using the H5P icon of the editor.
Weitere Informationen
Bei Fragen zur Barrierefreiheit wenden Sie sich bitte an die entsprechende Supporteinrichtung Ihrer Hochschule.
Dieses Werk steht unter einer Creative Commons Attribution-ShareAlike 4.0 Lizenz:
https://creativecommons.org/licenses/by-sa/4.0/
Further information
If you have any questions regarding accessibility, please contact the relevant support facility at your university.
This work is licensed under a Creative Commons Attribution-ShareAlike 4.0 License:
https://creativecommons.org/licenses/by-sa/4.0/